Community

Share your best AI workflow. We could show it to 2M+ people.

Every day, we feature the community's top-voted AI workflow in The Rundown newsletter. One post will put you on the radar of top founders, hiring managers, and operators across the industry.

Welcome!

Personalize Job Applications with GPT, Canva, and Role-Specific CVs

I built a job application workflow that goes beyond finding vacancies and generating generic CVs. First, GPT helps me scan for vacancies that match my practical requirements, interests, skills, and preferred types of work. The more useful part starts when a vacancy looks genuinely promising. I connected GPT to Canva and created several “base CVs” for the sectors and roles I was interested in. Instead of using one universal template, I designed each CV to fit the visual and cultural tone of a particular type of work. For example, a front-desk role, a back-office administrative position, and an assistant role in a creative company may involve overlapping skills, but they communicate very different expectations. Each base CV therefore uses different layout choices, colour use, visual tone, and photo selection. For every version, I review several possible photos and choose the one that best matches the role and the impression I want to convey. When I apply for a specific vacancy, GPT helps turn the relevant base CV into a more personalized version. Instead of rewriting my entire work history, we emphasize the experience, tasks, strengths, and values that are genuinely most relevant to that role. The same applies to motivation letters. Rather than generating a generic corporate letter, GPT uses a tone of voice shaped through months of conversation with me. The goal is for the application to sound recognizably like me while still matching the language, priorities, and culture of the vacancy. Before building this workflow, I did everything manually. For a vacancy that felt worth applying to, I typically spent around two hours refining the CV and motivation letter alone, not including the time spent searching for the vacancy. Even a small typo in the final application email could undermine hours of careful work. Now, once I decide a vacancy is a good fit, the full personalization process takes around twenty minutes on average. That includes selecting the right base CV, adapting the emphasis, refining the letter, checking the tone, and preparing the final application. The workflow works across several layers: vacancy discovery, role and sector matching, base CV selection, adapting experience and values, adjusting visual tone, personalizing the letter, final review, and application. What I like about this approach is that personalization is not limited to inserting keywords from a vacancy. It includes content, visual identity, emphasis, tone, and context. The result is a small family of CVs rather than one document being stretched awkwardly across every possible job. Each version keeps the same underlying career history while presenting the parts that matter most for a particular type of role. The biggest improvement is not only speed but consistency. The workflow reduces repetitive manual rewriting while keeping each application specific, personal, and carefully matched to the role. It turns roughly two hours of manual polishing per strong vacancy into about twenty minutes of collaborative refinement, with fewer opportunities for small final-stage errors to spoil an otherwise strong application. Step-by-step: 1. I use GPT to scan for vacancies that match my practical requirements, interests, skills, and preferred types of work. 2. When a vacancy looks promising, I identify the relevant sector, role, and type of impression I want to convey. 3. I use Canva and GPT to create and maintain several base CVs, each with its own layout, colour use, visual tone, and photo selection. 4. For each base CV, I review several possible photos and choose the one that best fits the role and the impression I want to convey. 5. I select the base CV that best matches the vacancy. 6. I adapt the CV by emphasizing the experience, tasks, strengths, and values that are genuinely most relevant instead of rewriting my entire work history. 7. I use GPT to personalize the motivation letter in a tone shaped through months of conversation with me, while matching the vacancy’s language, priorities, and culture. 8. I check the tone, review the application for small errors such as typos, and prepare the final application. 9. I complete the personalization process in around twenty minutes on average instead of spending roughly two hours on manual polishing for a strong vacancy.

Tools used
Industry
#jobapplications#resume#vacancyalert
3

Automate Credit Card Expense Tracking in Google Sheets with Make

I built a workflow to track my monthly credit card expenses and keep them within my budget. Tracking my expenses is important to me because I want to reach my financial goals through consistency and healthy habits. However, entering each expense manually into Google Sheets was tiring and took several hours. I used Make to automate the process. The workflow reads the email from my bank every time I use my card, gathers the necessary information, converts it to JSON, and adds it to Google Sheets. It runs every six hours, every day, so I no longer need to spend my weekends reviewing expenses. Now I have more free time to build something else and only need a couple of minutes to review Google Sheets and make sure everything is working properly. Step-by-step: 1. I set up a workflow in Make to monitor emails from my bank whenever I use my credit card. 2. The workflow gathers the necessary expense information from each email. 3. It converts the information into JSON format. 4. It adds the expense data to Google Sheets. 5. The workflow runs every six hours, every day. 6. I spend a couple of minutes reviewing Google Sheets to make sure everything is working properly and that my expenses remain within budget.

Tools used
Industry
3

Build a Real Estate Lead-Qualification Funnel with Awish.ai

Today, I wanted to see how far an AI agent could go if I gave it a real business instead of a predefined automation. I entered binayah.com into Awish.ai. Binayah is a real estate company, and instead of telling Awish.ai exactly what workflow to build, I asked it to analyze the business first and find an automation opportunity. It suggested a customer acquisition funnel, which I reviewed and approved. Around 10 minutes later, the automation was ready. Step-by-step: 1. I entered binayah.com into Awish.ai. 2. Awish.ai agents analyzed the website and how the business operates. 3. Awish.ai identified customer acquisition as an area that could be automated. 4. It suggested a funnel designed to capture and qualify potential leads. 5. I reviewed the suggestion and approved it. 6. Awish.ai created the workflow and connected the required steps. 7. The funnel was ready to use in around 10 minutes. What I find most interesting is that I didn’t start by designing a workflow. The system first understood the business, found an opportunity, suggested what should be automated, and built it only after I approved. That feels much closer to having an automation consultant inside the product than using a traditional workflow builder.

Tools used
Industry
#automation#businessautomation#productivity#saas#salesautomation
2

Build an n8n AI Newsletter Digest in Gmail

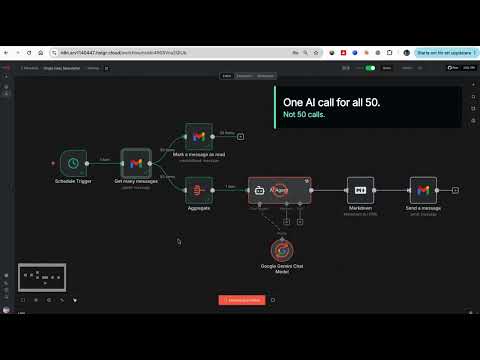
One email instead of 50: an n8n workflow that reads all my AI newsletters and sends me a single daily digest in under 2 minutes THE PROBLEM: I subscribe to dozens of AI newsletters. The Rundown, Superhuman, TLDR, The Neuron, AlphaSignal, TheSequence, Turing Post and many more. Reading them took hours every day, and most of them cover the same three stories. I wanted the coverage without the reading time. So I moved every subscription to a dedicated Gmail address and let n8n read that inbox for me. It has run daily since February 2026 and I now read one email a day instead of 50. STACK: n8n (hosted on Hostinger), Gmail, Google Gemini 2.5 Pro. HOW TO BUILD IT: STEP 1: Create a dedicated Gmail account and move every newsletter subscription to it. This one decision makes everything else simple. Your personal inbox stays clean and the workflow never touches mail that is not a newsletter. STEP 2: Schedule Trigger node, daily at 08:00. Set the workflow timezone (mine is Europe/Stockholm) or the trigger runs on server time. STEP 3: Gmail Get Many Messages node on the newsletter account. Filter by read status: unread. Return All: on. Simplify: OFF. That last toggle matters, see gotcha 2. STEP 4: Connect two branches off that node. Branch one is a Gmail Mark As Read node with message ID {{ $json.id }}. Unread is the whole state system: each run only fetches what arrived since the last run. No database, no date filters, no dedupe logic. STEP 5: Branch two is an Aggregate node. Aggregate the "html" field of every email into one array field called CombinedNewsletter. This means one AI call per day instead of one call per email. STEP 6: AI Agent node with a Google Gemini Chat Model attached (models/gemini-2.5-pro). Turn on Retry On Fail with 5000 ms between tries. The prompt: Below is all the news in html format. Only use what is provided; if the HTML looks cut off, still summarize everything you can see. {{ $json["CombinedNewsletter"].join('\n\n').substring(0, 250000) }} The substring cap is load bearing, see gotcha 1. System message (verbatim, numbering written as (1) so this form does not strip it): "You will receive ALL the AI newsletters from the past day in HTML format. Your task: (1) Extract every distinct news item (no duplicates, even if repeated in multiple newsletters). (2) For each item, find: a short, human-readable title, the best URL, a one-sentence summary (max 25 words). (3) Estimate popularity based on how many newsletters mention it. If an item appears only once, rank by how interesting the general public might find it. Output format (Markdown only): # Daily AI News Digest, then '## Top headlines' listing the 5 most popular/important items as 'Title Summary sentence', then '## More news' listing all remaining items in the same format. Rules: Always use Markdown links like Title, never show bare URLs. Do not skip any news item. Do not add any commentary, explanations, or closing text beyond the structure above." STEP 7: Markdown node, mode Markdown to HTML, destination key combinedHTML. STEP 8: Gmail Send node to your personal address. Subject: Here's ALL the AI News! {{now.toFormat('yyyy-MM-dd')}}. Wrap {{ json.combinedHTML}} in a full HTML document with inline CSS: white card, max-width 720px, system fonts, styled links. See gotcha 4. FOUR THINGS THAT COST ME HOURS: (1) Raw newsletter HTML broke Gemini. The workflow refused to execute with a payload limit error. Newsletter HTML is enormous: tracking pixels, nested tables, inline styles. Fifty of them concatenated is millions of characters. The .substring(0, 250000) cap in the prompt fixed it, and the "if the HTML looks cut off, still summarize" line tells the model how to handle the truncation. (2) Gmail's Simplify toggle is on by default and strips the message body. Gemini kept receiving empty or gutted content and no error explained why. Turn Simplify off to get the full html field. (3) Gemini rate limits AND timeouts both hit on big runs. Retry On Fail with a 5 second wait fixed both. Without it, one 429 kills the whole morning digest. (4) Sending the model's raw markdown as email looked broken in Gmail. Two part fix: a Markdown to HTML node, then a proper HTML template with CSS in the send node. RESULT: the latest real run turned 50 unread newsletter emails into one clean digest in less than 2 minutes (1 minute 27 seconds to be exact). Running every morning since February 2026. Honest failure mode: mark as read runs as a parallel branch, so if Gemini fails after all retries, that day's emails are already marked read and drop out of tomorrow's digest. I accepted that trade off. The alternative is duplicate items on every retry, and one missed day costs less than a digest full of repeats. Rebuild time: about 30 to 45 minutes if the dedicated inbox already exists.

Tools used
Industry
#dailydigest#emailautomation#informationoverload#newsletter#summarization
6

Build a Claude-powered AI newsletter tool catalog with search

I built a system that reads my AI newsletters every morning and turns them into a searchable catalog of AI tools, plus a chat website where I can ask questions about the catalog in plain English. The system has two parts: a workflow that collects the information and a website that answers questions about it. I subscribe to several AI newsletters, and each issue mentions five or ten interesting tools. I would read about one and think, “I should remember that.” Months later, I would vaguely remember it but have no quick way to find it. I wanted a repository of these AI tools that I could search easily. The collector is a scheduled Claude Code Routine that runs once a day. It searches Gmail for newsletters from the last 24 hours and reads each email in full. It extracts every AI tool’s name, description, category, official link if present, and source newsletter. It skips non-AI items and pure ads but keeps sponsors that are genuine tools. Before adding anything, it checks for duplicates. New tools are added under the appropriate category in alphabetical order. If an existing tool has fresh details, its description and “last updated” date are refreshed. Tools mentioned by three or more sources receive a “Highly Mentioned” tag, which is a useful signal for what is catching on. The workflow also creates categories when new tools do not fit into an existing one. The workflow commits and pushes the catalog to a private GitHub repository, then posts a summary to Slack. The catalog is a single Markdown file—plain text, human-readable, and versioned in Git, with no database. The chat website displays the tool count, category count, and last-updated date, along with clickable example questions. If I ask, “Is there anything for voice AI?” it returns a written answer listing every match with descriptions and working links. The site is a React single-page app on Netlify with two small backend functions: one returns the statistics, and the other handles chat. When I ask a question, the backend fetches the Markdown file from the private repository, sends it to Claude along with my question, and returns the answer. To recreate it, you’ll need a GitHub account, Netlify (the free tier is fine), an Anthropic API key, and Claude Code. The routine prompt is the most important part. It names the exact newsletters, lists the fields to extract, and explicitly says: never invent a URL, never delete an entry, and only add or update. Vague instructions produce files that degrade over time. I learned a few things the hard way. Newsletters deleted before the workflow runs may cause it to report “nothing new,” so the logic should also check Trash or Deleted items. Tokens expire, and mine quietly expired, which caused the search site to stop working. Choose a long expiration period and record the date. Also, explicitly say “never invent a URL,” or the workflow may produce plausible links that go nowhere. It now runs every morning without me. When I need something, I ask a question and get an answer in seconds instead of trying to remember which newsletter, and which month, mentioned the tool I’m thinking of. Step-by-step: 1. I created a private GitHub repository with a starter Markdown file containing “Last updated” and “Total tools” fields, category headings, and consistent fields for each tool. 2. I wrote a Claude Code Routine prompt that names the newsletters, specifies the fields to extract, and instructs the workflow never to invent a URL, never to delete an entry, and only to add or update tools. 3. I scheduled the routine to run daily with Gmail access. 4. Each day, the routine searches Gmail for newsletters from the previous 24 hours, reads them, extracts AI tools, skips non-AI items and pure ads, preserves genuine tool sponsors, and checks Trash or Deleted items when necessary. 5. The routine checks for duplicates, adds new tools alphabetically under the right category, updates existing tools with fresh details, creates categories when needed, and applies the “Highly Mentioned” tag to tools found in at least three sources. 6. The routine commits and pushes the Markdown catalog to the private GitHub repository and posts a summary to Slack. 7. I built the frontend with Vite and React, including a statistics header, a scrollable message list, an input box, and example questions. 8. I added two backend functions: one for statistics and one for chat, with the GitHub fetch handled by a shared helper with a short cache. 9. I created a fine-grained, read-only GitHub token limited to the single repository. 10. I deployed the site to Netlify with the required keys stored as environment variables rather than in the code. 11. When I ask a question, the backend fetches the Markdown catalog, sends it to Claude with my question, and returns the matching tools, descriptions, and links.

Tools used
Industry
#aiautomation#aitools#claudecode#gmail#knowledgebase

Find Missing Business Automations with Awish

I conducted a workflow experiment with Awish, the product I built, and the results surprised me. I think this approach could be useful for anyone who wants to automate more of their business but is not sure where to start. I gave Awish my website, and it identified the automations my business was missing. The difficult part was not always building a workflow; it was figuring out which tasks were worth automating first. I opened Awish and asked: “Analyze my business from awish.ai, suggest automations that could improve how I work, and only build them after I approve.” Awish’s agents analyzed the website to understand what the business does, how customers interact with it, and where repetitive work could be automated. Instead of asking me to design a workflow from scratch, Awish suggested several automations based on the business. One suggestion was a lead workflow that finds relevant prospects and automatically prepares and sends personalized outreach emails. Another was a website inquiry workflow that analyzes new customer requests, identifies what they need, and sends me the important details as a WhatsApp notification. It also suggested a content workflow that creates and publishes posts for Instagram, X, and LinkedIn based on the business and its content strategy. I chose the lead generation and automated email workflow. Step-by-step: 1. I opened the Awish chat and asked it to analyze my business from awish.ai, suggest automations that could improve it, and only build something after I approved it. 2. Awish’s agents analyzed the website and identified repetitive sales, customer communication, and content tasks that could be automated. 3. Awish suggested a lead generation and email outreach workflow, a website inquiry analysis and WhatsApp notification workflow, and a social content workflow for Instagram, X, and LinkedIn. 4. I selected the lead generation and automated email workflow. 5. Awish’s agents understood the request and created the workflow plan, including how leads should be found, what information should be collected, and how personalized outreach should be prepared. 6. Awish selected the applications needed for the workflow and showed me the connections before anything was built. 7. I approved the plan and connected my personal accounts to the required applications through the sign-in flow instead of manually setting up each integration. 8. Awish built the automation within minutes, so new leads could be identified, researched, and contacted through the workflow without me having to design each step manually. What I like about this approach is that I do not need to know the exact automation I want before I start. I can begin with the business itself, let the agents identify useful opportunities, choose the one that makes sense to me, and then approve the build.

Tools used
Industry
#aiagents#businessautomation#leadgeneration#salesautomation
0

AI-Assisted Genealogy Research for a Family Mystery

I used AI to help investigate a family mystery that had remained unresolved for decades: identifying the biological family of my maternal grandfather. The challenge was not a lack of information. It was almost the opposite. I had DNA matches, family trees, names, dates, historical records, old photographs, obituaries, Facebook genealogy groups, and conversations with possible relatives. The difficult part was connecting all these scattered clues without jumping to conclusions. I built a research workflow in which AI acts as an investigation partner, not as the source of truth. Step-by-step: 1. I gathered the information I already had from genealogy platforms, DNA matches, family trees, historical documents, and family records. 2. I used ChatGPT to organize the evidence into people, dates, locations, relationships, DNA connections, documents, and unresolved questions. 3. I separated the information into three categories: confirmed facts, hypotheses, and missing information. 4. Instead of asking AI, “Who was my grandfather's biological father?”, I asked it to analyze possible family connections and identify which hypotheses were compatible with the available evidence. 5. For each hypothesis, I looked for supporting evidence, contradictory evidence, and information that was still needed. 6. I treated AI-generated connections as leads rather than genealogical proof. The goal was to use AI to decide what to investigate next, not to have it find the answer. 7. I used AI to compare family branches, surnames, generations, locations, and possible relationships among DNA matches whose family connections I did not immediately recognize. 8. When a promising connection appeared, I returned to the original genealogy and DNA sources to verify it. This gradually turned a long list of DNA matches into a smaller number of research paths. 9. I used AI to draft respectful, personalized messages to DNA matches and members of genealogy communities, including people in another country and language. 10. In each message, I explained what I was researching, what connection I suspected, what information I already had, and what I hoped the recipient might be able to confirm or rule out. 11. I treated their responses as new evidence and repeated the investigation loop: evidence → AI analysis → hypothesis → verification → human contact → new evidence → updated hypothesis. The final result is not an “AI-generated family tree.” It is a human-led investigation in which AI helps manage complexity, ask better questions, and identify the next useful action. The most important lesson I learned is that AI is particularly useful in genealogy when you do not ask it to give you the answer. Ask it to help you build the investigation.

Tools used
Industry
#dataanalysis#dna#familyhistory#genealogy#research
4

Automate a Daily Email and Calendar Brief with Codex Automations

I wanted to reduce the time and mental effort it takes each morning to figure out what needs my attention across my inbox and calendar. I used Codex Automations to build Briefly, a daily AI-powered email and calendar brief that is automatically delivered to my inbox every day. Instead of manually searching through emails and checking separate calendar events, I can open one message from Briefly and immediately see what is happening, what needs action, and what is coming up. It has become a simple way for me to use AI proactively—not only when I ask a question, but as an automated system that helps me stay ahead of my emails, tasks, and schedule each day. Step-by-step: 1. I connected the email and calendar sources I wanted the automation to review. 2. I created a Codex Automation that runs each morning. 3. I instructed it to review recent and important emails, identify messages that need attention or follow-up, and check my calendar for upcoming meetings and commitments. 4. I had it turn that information into a concise daily brief. 5. I configured the brief to be delivered to my email automatically.

Tools used
Industry
4

Build a Digital Second Brain from OpenBrain and LLM Wiki Ideas

I built a digital Second Brain after trying several approaches, including OpenBrain and LLM Wiki. OpenBrain and LLM Wiki are useful frameworks for building a digital brain. The theory is solid: flat Markdown files, AI-first conventions, and an ingestion pipeline that turns raw inputs into searchable knowledge. But when applied in practice, the process can be bumpy and may require adjustments—or an entirely different approach. I adapted the ideas to fit how I actually think and work. I kept what worked, discarded what didn’t, and built my own digital brain. The result is documented in a single file containing everything an AI needs to understand, maintain, or rebuild the system from scratch. Step-by-step: 1. I tried several digital-brain frameworks, including OpenBrain and LLM Wiki. 2. I evaluated their approaches, including flat Markdown files, AI-first conventions, and an ingestion pipeline for turning raw inputs into searchable knowledge. 3. I identified where the frameworks were difficult to apply in practice and adjusted my approach. 4. I kept the ideas that worked for me, discarded what didn’t, and built a digital brain suited to how I think and work. 5. I documented the system in a single file so an AI can understand, maintain, or rebuild it from scratch.

Tools used
Industry
#claudeobsidian#llmwiki#openbrain#secondbrain#vaultcortexmcp
toyman.zo.space https://toyman.zo.space/openbrain
4

Automate Daily Water-Leak Alerts for Rental Properties

I own a rental property where a water leak has occurred roughly every year or two. The leak typically runs for weeks before the water utility detects usage above its threshold. Because billing cycles last three months, the utility may notify me weeks or months after the problem begins. By then, the leak can have produced a bill more than $1,000 higher than the usual $100–$300 amount. The utility offers a one-time, per-account waiver for accidental leak overages. After using that waiver the first time, later incidents are entirely out of pocket. The utility also cannot notify me sooner than when usage exceeds 25,000 gallons during a billing cycle, which moves the account into a quadruple-rate tier for the rest of that cycle. I repeatedly asked whether they could provide an immediate alert when a user-set or company-set daily usage threshold was exceeded, but they said they had no system or solution for it. I tried checking my usage manually every day, but after weeks or months of normal readings, it was easy to become complacent or forget. After receiving another $1,300-plus bill, I asked ChatGPT whether I could automate the process of logging into my utility account, checking usage daily, and emailing me about the prior day’s usage or an overage. ChatGPT suggested several options, including paid AI-agent tools and a free script running on my own hardware. I wanted a completely free, cloud-based solution that would not require my computer to stay on, so I compared the paid options, including Google Spark, with a GitHub-based system. GitHub apparently includes 2,000 minutes of script runtime per month, while my system was estimated to use about 100 minutes. I spent part of a day asking ChatGPT questions, copy-pasting code into GitHub, and refining it. I now have a cloud-based system that logs into my water utility account, checks daily usage, emails me when my daily or seven-day-average thresholds are exceeded, and adds each day’s usage to an Excel spreadsheet for ongoing history. I have verified that it works, and it is set up to keep running and sending alerts without ongoing cost. I had never coded before. The system uses Python, GitHub Actions/YAML, Playwright, pandas, openpyxl, Excel, and Gmail for email alerts. Excel and Gmail were the only tools in that list I had used previously. If I want to change an alert threshold or another setting, I can log into GitHub and ask ChatGPT for the relevant code adjustment. I also added a second rental property in the same city that uses the same water utility. Replicating the process for that property required only a small amount of additional code and took almost no time. I now have a perpetually self-updating, cloud-based water-usage database with daily email alerts for both rental properties, at zero ongoing cost.

Tools used
Industries
2

Build an AI Writing Business Automation System with OpenClaw

I set up an AI assistant to run my entire writing business on autopilot. Every morning, it pulls RSS feeds from more than 30 AI and writing sources, deduplicates them against the previous day’s digest, curates the top items, and sends me a single Telegram message with numbered, linked items before I wake up. At 11 a.m. each day, it generates an original writing craft post. The topic comes from a rotation pool of more than 15 categories, and the assistant avoids anything used in the last 30 days. It also creates accompanying artwork in a rotating fine-art style, then cross-posts the content to Facebook, X, and my blog, including the featured-image upload to WordPress. Each week, it compiles and sends an email newsletter to my subscriber list through Brevo. It pulls from a curated candidates file that I approve before the newsletter goes out. Behind the scenes, the assistant manages a fleet of five servers, including servers for my wife, daughter, and two business colleagues. It handles daily backups, monitors costs across providers, and reminds me when context windows are becoming expensive. The key insight wasn’t the automation; it was the partnership model. My assistant has a persona file (`SOUL.md`) that defines how it communicates, a memory file (`MEMORY.md`) with everything it needs to know about my life and business, and a playbook of behavioral rules built from real mistakes over time. It pushes back on bad ideas, flags risks before executing, and has genuine opinions about craft and content. That shift—from “tool you talk to” to “colleague who has your back”—is what I wrote my book about. *Harnessing the Machine* is the field guide I wish I’d had when I started. It isn’t a tutorial, because the technology changes weekly; it’s a guide to building a working relationship with something that remembers yesterday. The tech stack is OpenClaw, GLM-5.2 as the primary model, DeepSeek V4 Pro as the fallback, and AWS Lightsail. The total monthly cost is under $30. The real cost was calibrating the assistant: teaching it what I care about, what “good” looks like, and when to ask versus when to act. That’s the part most people skip, and it’s why most “AI automation” posts feel like demos rather than relationships. Tools used: OpenClaw, GLM-5.2, DeepSeek, Telegram, WordPress, Brevo Step-by-step: 1. I configured OpenClaw with a persona file (`SOUL.md`), a memory file (`MEMORY.md`), and a behavioral playbook built from real mistakes. 2. I connected it to RSS feeds from more than 30 AI and writing sources and had it deduplicate, curate, and send a numbered Telegram digest each morning. 3. I created a rotation pool of more than 15 writing categories and instructed it to avoid topics used in the previous 30 days. 4. I scheduled it to generate a daily writing craft post, create artwork in a rotating fine-art style, and cross-post the result to Facebook, X, and my WordPress blog with a featured image. 5. I set up a weekly Brevo newsletter that pulls from a curated candidates file I approve before sending. 6. I connected the assistant to five servers, including servers for my wife, daughter, and two business colleagues, and had it manage daily backups, provider costs, and expensive context windows. 7. I configured GLM-5.2 as the primary model, DeepSeek V4 Pro as the fallback, and AWS Lightsail as the hosting environment. 8. I calibrated the assistant by teaching it my standards, what “good” looks like, and when to ask for approval versus acting on its own.

Tools used
Industries
#aipartnership#automation#openclaw#persistentagent
2

Find My Best AI Opportunity

It starts when someone clicks “Find My Best AI Opportunity” on my website. Instead of going straight to a booking page, they enter a short AI chat. The assistant asks about their work, business, main pain point, AI experience, urgency, name, and email. The workflow runs in n8n. Once the chat has enough information, it creates an AI Readiness Summary, saves the lead in Notion, sends me an internal brief, and emails the visitor their summary with a link to book a 30-minute call through Cal.com. The result is a better-qualified call: the visitor gets useful value first, and I have the context I need before we meet. Step-by-step: 1. A visitor clicks “Find My Best AI Opportunity” on my website. 2. The visitor completes a short AI chat about their work, business, main pain point, AI experience, urgency, name, and email. 3. n8n uses the collected information to create an AI Readiness Summary. 4. The workflow saves the lead in Notion and sends me an internal brief. 5. The visitor receives their summary by email, along with a link to book a 30-minute call through Cal.com. 6. I review the context before the call, making it better qualified.

Tools used
Industry
2

Fix Content Hallucinations in an AI News Digest with Make and Claude

My AI digest looked perfect and was quietly wrong. What actually fixed it. Every run succeeded. Every dashboard was green. And the content was still wrong. My digest invented "AI Moat Brief", a newsletter that does not exist. It reported scan counts nobody measured. It resurfaced week-old stories as fresh headlines. Here is what broke, and what fixed it. The sorting used to happen in my head: skimmed subject lines, unopened tabs, quiet guilt. The Signal is one email at 08:00: a single Make scenario calling Claude Sonnet through OpenRouter. It reads the last 24 hours of my RSS feeds and newsletters, keeps what touches what I am actively building plus the domains I need to stay current in, and arrives in the language I actually think in. Core items end with what it means for my work. Five to ten minutes, and I know where to go deep today. Structurally it looks like this, minus the content, rendered in English for this post (Image 1). No real edition is shown; section names and sample lines are illustrative. The dangerous failures were never pipeline failures. They were content failures, and the cause is structural: an LLM summarizing newsletters that already summarize primary sources is third hand by construction. Every hop strips attribution and adds confidence, and when data goes missing the model fills the gap the way LLMs do: fluently. Valid HTML, confident tone, green pipeline, wrong content. Image 2 is that whole failure class in one frame. Three rules closed the gaps I caught, all live in production: Step-by-step: 1. Verbatim or nothing. A source name is copied character for character, and a link exists only if that exact URL is in the input. The model copies; it never composes. 2. The model never generates metrics. Every count the report shows is injected by the pipeline after the model returns. 3. Recycled news gets demoted. A recap of recaps gets one line at most, and is dropped when the underlying story falls outside the collection window. Rules 1 and 3 lean on the prompt, and that is why the counters exist. The pipeline writes a hidden HTML comment into every email it sends: items, links, urls, cost, finish status. That line caught what I could not see. In one run, the published-links counter and the leftover-urls counter read 45 and 435: the only sign a new cleanup step was a silent no-op. Another morning the model stopped at 15,999 tokens against a 16,000 cap, one token from an email cut off mid-sentence. On the morning I wrote this they agreed, 21 links and 21 urls, and boring is the goal. Image 3 is that morning's actual comment, with the same two counters from the no-op run. The run itself has a dead man's switch on Healthchecks.io, so a missing 08:00 email reaches me before I notice. Honest limits: the $0.31 per report is a fresh measurement I am still validating, and I have not proven these rules hold as the source set scales. There is more behind every part of this; I would rather share it where it is wanted. Ask and I will put it in the comments: the three rules in full, the exact cost and what drives it, what this replaced in my day, how it compares to what is on the market, or the ugliest of the 15 documented bugs. I am sharing this because I doubt I am the only one building fragile things behind the scenes, and monitoring text is harder than monitoring uptime. What content-level checks do you run on LLM output, the kind pipeline monitoring cannot see? Real thresholds and embarrassing failures especially welcome.

Tools used
Industry
#hallucination#llmobservability#newsletterdigest#promptengineering#rss
4
pro The Rundown team

Build a 24-hour company brief that writes in my voice

I have a Daily Brief agent on Codex with access to my Slack, Gmail, Notion, and Google Drive that checks everything that happened in the last 24 hours on request. It sends me the brief through Slack, and I do maybe 10% of the final manual editing. I also gave it several examples of before/after editing, so now it sends messages in my exact voice and style. Step-by-step: 1. I connected my Daily Brief agent in Codex to Slack, Gmail, Notion, and Google Drive. 2. I told it to review activity from the last 24 hours and pull out the items that actually needed attention. 3. I structured the output as a concise brief and had Codex deliver it through Slack. 4. I manually reviewed the draft and made the final edits before using it. 5. I gave the agent before-and-after examples of those edits so future briefs would sound more like my own voice.

Tools used
Industry
#automation#productivity
1

Automate Post-Sales-Call CRM Updates and Follow-Ups with Awish

After a sales call, the conversation is only part of the work. Someone still needs to write the notes, update the CRM, remember the next step, prepare the follow-up email, and make sure the deal does not disappear between meetings. I wanted that entire post-call process to happen automatically. I created an Awish workflow that starts when a sales call ends. It analyzes the conversation, extracts the important sales information, updates the CRM, creates the next actions, drafts a personalized follow-up email, and sends the team a short summary. The workflow looks for the information I would normally write down myself: what the prospect needs, the objections they raised, their timeline, agreed next steps, and anything that could affect the deal. Customer-facing actions stay under my control. The workflow prepares the follow-up, but I can review important messages before they are sent. Step-by-step: 1. I tell Awish what I want to happen after every sales call: analyze the conversation, update the CRM, prepare the follow-up, and notify the team. 2. Awish understands the request, plans the workflow, and determines which applications are needed. 3. I connect my meeting platform, HubSpot, Gmail, and Slack to the automation. 4. When a call ends, the workflow analyzes the transcript and extracts the prospect’s needs, objections, timeline, decisions, and agreed next steps. 5. It creates or updates the contact and deal in HubSpot and adds any follow-up tasks that came out of the conversation. 6. It drafts a personalized Gmail follow-up based on what was actually discussed instead of using a generic sales template. 7. It sends a short Slack summary to the team with the deal status, important points, and next action. Instead of a sales call ending as a transcript or a page of notes, it immediately becomes structured CRM data, clear next actions, and a follow-up that is ready to review. The useful shift for me is that the workflow is not replacing the sales conversation. It is handling everything that normally gets forgotten or delayed after the call.

Tools used
Industry
#crmautomation#revenueoperations#salesautomation#workflowautomation
2

Documentary film archival research bot

I’m researching two separate documentary films. For each project, the bot runs three web crawls and one health check every day. Based on my notes, scripts, and other existing initial research, it identifies research domains by theme and media type, favoring audio and images while applying a higher threshold to other documents. Anything scoring eight or higher is logged in Notion and downloaded automatically when possible. The bot cycles through different themes, and the health check adjusts the similarity threshold based on the results. If many items score eight, it may log and download only nines. If fewer qualifying items appear, it may begin downloading sevens. Most items cannot be downloaded because they are inaccessible to the bot, but they are still logged and linked. I review the items in Notion and mark each one according to criteria such as “people only for research” or “reject—permissions required.” It isn’t a full replacement for professional archival research, but I feel it’s getting me 90% of the way there. As an independent filmmaker, this is a huge benefit. Each morning, it sends me a synopsis, and each week, it sends me a list of pre-written emails to send to archives that require human interaction. Step-by-step: 1. I provide the bot with my notes, scripts, and existing initial research for each documentary project. 2. For each project, the bot runs three web crawls and one health check every day. 3. It identifies research domains by theme and media type, with a preference for audio and images and a higher threshold for other documents. 4. It logs items scoring eight or higher in Notion and automatically downloads them when possible. 5. It cycles through different themes and uses the health check to adjust the similarity threshold: it may focus on nines when many eights appear, or begin downloading sevens when fewer qualifying items appear. 6. It logs and links items that cannot be downloaded because they are inaccessible to the bot. 7. I review each item in Notion and mark it according to criteria such as “people only for research” or “reject—permissions required.” 8. Each morning, I receive a synopsis, and each week, I receive pre-written emails for archives that require human interaction.

Tools used
Industry
4

Build Client Growth Automations from a Business Website with Awish

I wanted to see what Awish would automate first if I gave it a real client business instead of a predefined workflow. I used Martolia Marble, one of my previous clients, and gave Awish the website. I asked it to analyze the business, suggest automations that could support growth, and build them only after I approved them. Awish analyzed the website and proposed several opportunities. I chose two: a lead generation and email outreach workflow, and an Instagram workflow that tracks relevant trends, plans content, creates posts, and publishes them. Step-by-step: 1. I gave Awish the Martolia Marble website and asked it to analyze the business. 2. Awish identified areas where automation could support growth and suggested workflows. 3. I approved a lead generation workflow that finds relevant prospects and prepares personalized email outreach. 4. Awish selected the required apps, I connected the accounts, and the agents built the workflow. 5. I also approved an Instagram workflow that analyzes relevant trends, plans upcoming content, creates the posts, and publishes them. 6. Once the accounts were connected, both automations were ready to run without me manually building each step. What I liked most was starting with the business rather than with an automation idea. I gave Awish the website, reviewed its suggestions, and approved only the workflows that made sense for the client.

Tools used
Industry
#businessautomation#leadgeneration#marketingautomation#salesautomation
0